It also fails faster than almost any other flooring product when the installation is wrong. And the failures almost never happen because the tile itself was bad. They happen because something underneath it was not done correctly.
We have seen tile crack at the grout joints within six months of installation. Not because the tile was cheap. Because the thinset coverage underneath was insufficient — a common shortcut on large-format tile that produces a floor that looks finished but is hollow underneath and cracks the first time something heavy is dropped on it.
This page covers tile floor installation — subfloor preparation, underlayment, layout planning, tile setting, grouting, and sealing. We handle your tile floor from subfloor assessment through final grout, seal, and cleanup.
What Tile Floor Installation Covers for Brownsburg Homeowners
Here is how professional tile floor installation actually works in Brownsburg from the first assessment to the final seal:
- The remodeler inspects the subfloor for levelness, structural integrity, and moisture — tile requires a rigid, flat base or it will crack
- The subfloor is repaired and cement backer board or an uncoupling membrane is installed to create a stable tile substrate
- The room is measured and layout lines are snapped using the 3-4-5 rule to ensure perfectly square tile rows from the start
- Thinset mortar is spread and combed with a notched trowel; tiles are set, pressed, and spaced with consistent joints
- Cut tiles are measured and made at walls, doorways, and obstacles to complete the field
- Thinset cures fully — typically 24 hours — before grout is mixed and worked into all joints
- Grout is cleaned, haze is removed, and sealer is applied to grout lines and natural stone tile surfaces
Tile cannot flex with subfloor movement the way LVP can. When the subfloor shifts — and in Indiana it shifts seasonally — tile that is not properly isolated from that movement cracks at the grout joints first, then at the tile itself. Flooring contractor services in Brownsburg Indiana include selecting the correct uncoupling membrane or backer system for Indiana's freeze-thaw conditions. Standard installation guides often don't account for how Brownsburg subfloors behave over a full annual cycle.
What a professional tile floor installation in Brownsburg covers:
Subfloor inspection · Substrate installation · Layout planning · Thinset application · Tile setting · Cure time observed · Grouting · Sealing of grout lines and natural stone surfaces
What Goes Down Before Tile — Subfloor Prep Done Right in Brownsburg
This is the question most homeowners search before they call. Can I tile directly on my subfloor? The short answer is no — not on wood subfloor without a rigid substrate layer.
Here is why. OSB and plywood flex when weight is applied. Tile does not flex. When the subfloor moves and the tile above it cannot, the bond between thinset and tile breaks. That produces hollow spots — tiles that sound like a drum when tapped — and eventually cracks at the grout joints where the stress concentrates. The tile looks fine until it does not.
The two standard solutions for Brownsburg wood subfloors:
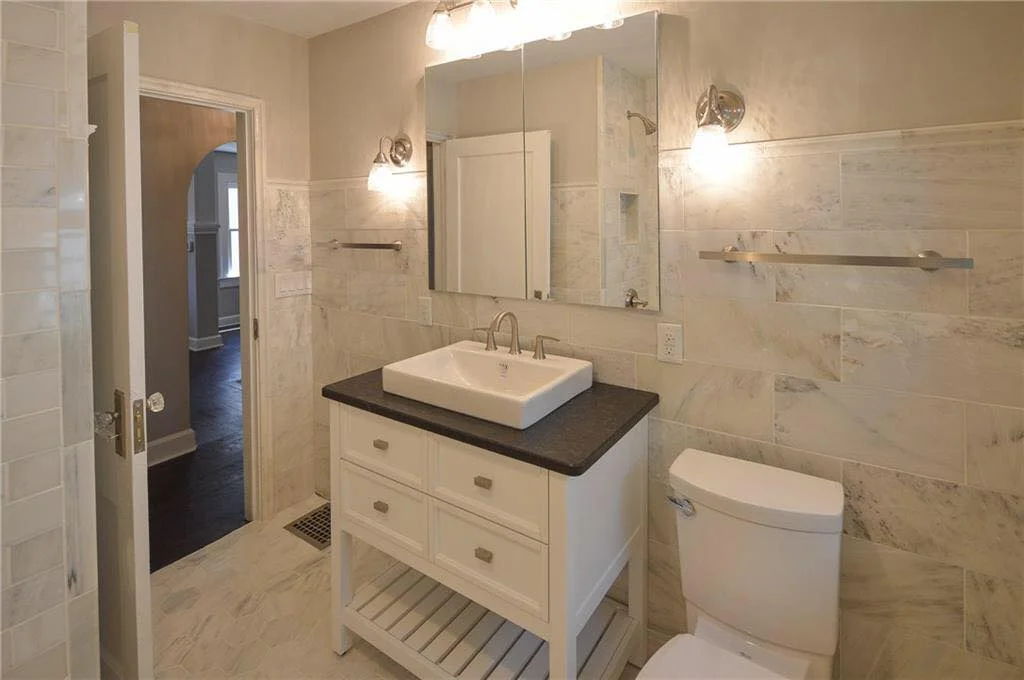
Cement backer board — screwed to the subfloor and joints taped with mesh and thinset before tile is set. Rigid, familiar, and cost-effective. Works well under most tile formats in kitchens, baths, and entryways. Adds a small amount of height to the floor — which needs to be accounted for at thresholds and transitions.
Uncoupling membrane — a thin plastic sheet with a matrix of cavities that tile sets into. It isolates the tile from subfloor movement instead of trying to prevent it. Better performance in rooms where seasonal subfloor movement is higher — which in Indiana means most ground-floor and slab-on-grade installations. Adds less height than backer board.
Many Brownsburg homes built in the 1990s have OSB subfloors that are not flat enough for large-format tile without additional leveling. We assess flatness to the 3/16-inch over 10-foot standard before any substrate or tile is ordered. Discovering a subfloor that needs leveling after tile is delivered adds time and cost that a site assessment would have avoided.
Concrete subfloors:
Acceptable for tile if they are clean, flat within 3/16 inch over 10 feet, free of significant cracks, and dry. We check all four conditions. A concrete slab that has been waxed, painted, or contaminated with adhesive residue from previous flooring needs to be mechanically abraded before thinset will bond to it. Skipping that step produces a floor where the tile bond fails at the slab surface — not at the thinset-to-tile interface.
How Tile Floor Installation Works From Layout to Final Seal
Most tile floor projects in Brownsburg run three to five days. Here is what each phase looks like and why the cure windows cannot be shortened.
Subfloor prep and substrate installation — usually day one. Levelness confirmed, leveling compound applied where needed and allowed to cure, backer board or membrane installed and fastened. For large rooms or significant leveling work, this phase can extend to day two.
Layout planning — before any tile is set, the room is squared using the 3-4-5 method and layout lines are snapped. The starting point is determined to produce balanced cuts at all visible doorways and walls. This planning phase takes an hour or two but prevents mistakes that cannot be fixed once tile is set.
Tile setting — thinset mixed, spread, and combed with the correct notch trowel for the tile format. Large-format tiles back-buttered before setting. Tiles pressed firmly and checked with a level or straightedge to prevent lippage. Cut tiles made at walls and obstacles.
Cure time — non-negotiable:
24 hours minimum before grouting begins. Thinset that has not fully cured is still flexible. Grout applied over flexible thinset will crack at every joint within weeks. In Brownsburg homes with slab foundations in spring and fall, slab floor temperatures run cooler than air temperature, which slows cure. We account for this.
Grouting — grout mixed, worked into all joints with a float, and excess removed before the surface haze sets up. Once the surface is haze-cleaned, grout cures for 24 to 72 hours before the floor is returned to use.
Sealing — grout lines sealed after full cure. Natural stone tile surfaces sealed before grouting and again after. Sealing protects porous grout from staining in kitchens and baths where the floor gets the most use.
Indiana's spring and fall temperature note: Thinset and grout cure times are specified for ambient temperatures above 50 degrees Fahrenheit. In Brownsburg homes where slab floors stay cold in early spring and late fall, we adjust product selection and cure schedules rather than applying warm-climate timelines that produce grout failure in Indiana's cooler conditions.
Common Tile Installation Mistakes That Cause Cracks and Failures in Brownsburg Homes
These are the failures we diagnose most often in Brownsburg homes where tile was installed by someone else. All of them are preventable.
The most common Brownsburg tile failure:
Hollow and cracked tile caused by insufficient thinset coverage. Large-format tile — anything 12 inches or larger — requires both floor thinset applied with a notched trowel and back-buttering the tile itself before setting. Together, they produce the 95% coverage standard the industry requires to prevent lippage and cracking. Installers who back-butter skip the floor troweling and do only one — producing coverage that is insufficient and concentrated at the trowel ridges rather than distributed across the full tile back. The floor cracks when anything heavy is dropped on it because there is no support underneath the hollow areas.
Other mistakes that cause tile to fail in Brownsburg homes:
- Tiling over a flexible subfloor without a rigid substrate — the most fundamental error; if the subfloor flexes and the tile cannot, the bond breaks. Backer board or membrane is required before any tile goes down on a wood subfloor.
- Wrong notch trowel size for the tile format — a small trowel used for large tile produces insufficient coverage because the mortar does not fill the full back of the tile. Notch size is specified by the tile manufacturer for the format being installed. Using the same trowel for every job regardless of tile size is a shortcut that produces hollow tile.
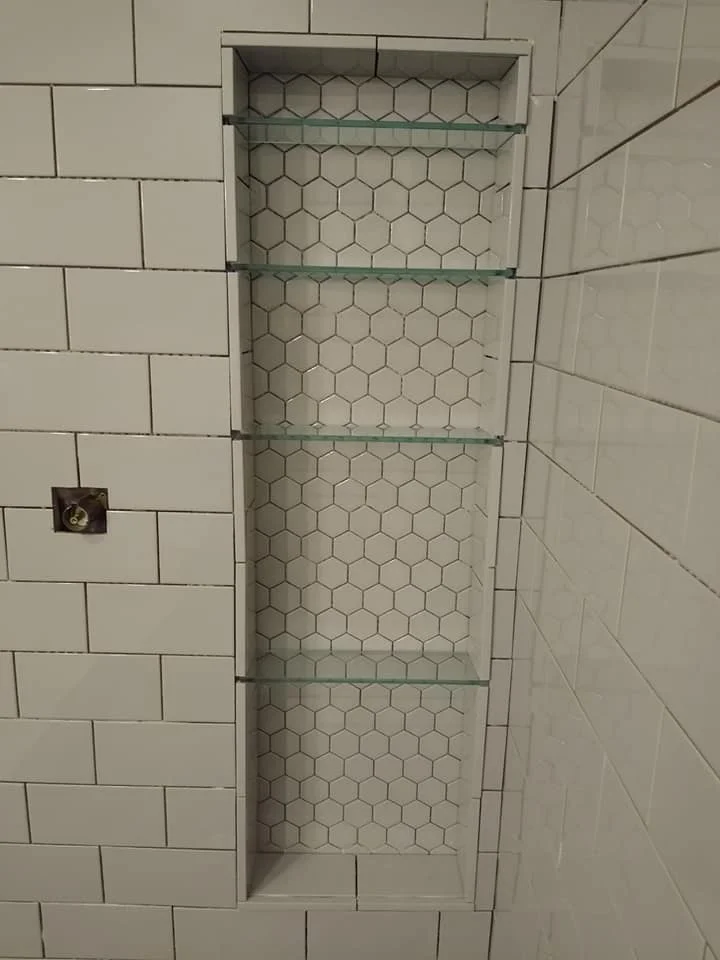
- Grout joints too small or missing entirely — tile expands slightly with temperature changes. If there is no grout joint — or the joint is smaller than the tile manufacturer requires — the tiles will press against each other and crack. Minimum grout joint sizes are specified by the manufacturer and the Tile Council of North America for good reason.
- Grouting before thinset is fully cured — fresh thinset is still flexible. Grout worked into joints over flexible thinset will crack at every joint as the thinset finishes curing and the floor returns to its final position. Waiting the full 24 hours is the only way to prevent this.
- Not sealing grout in high-use areas — unsealed grout in a kitchen or bathroom stains within months and becomes impossible to restore without regrouting. Sealing at installation is what keeps grout looking the way it did the day it was installed.
Tile Floor Layout Planning — Where to Start and How to Get It Square
Most homeowners have not thought about layout planning before they call. The crew shows up and starts laying tile — but where they start determines how the floor looks from every doorway in the room.
The principle behind every tile layout decision: The most visible cuts should be the most balanced. If a doorway opens onto a sliver of tile, every person who walks into the room sees it first. Planning the layout to put balanced cuts at visible entry points — even if it means the cut at the wall behind the toilet is uneven — produces a floor that looks intentional.
The 3-4-5 squaring rule — before any tile is set, the starting lines need to be perfectly square to each other. The 3-4-5 method: measure 3 feet along one line, 4 feet along the perpendicular line, and the diagonal between those two points should be exactly 5 feet. If it is not, the lines are not square. Starting with square lines means rows stay parallel to walls across a large floor. Starting with lines that are even slightly off square produces a floor that visibly fans away from the wall as you move across the room.
Starting in the center vs. starting at a wall — starting in the center of the room and working toward all four walls produces the most balanced cuts. Full tiles at the center, equal cuts at opposite walls. Starting at a wall and working across is faster but often produces a very narrow cut at the far wall that looks off from the room entry.
Brownsburg's kitchens and master bath floors from the 1990s and early 2000s are frequently out of square — original construction tolerances allowed the kind of variation that becomes obvious in a large tile installation. We measure and account for this before cutting begins. A tile layout that ignores an out-of-square room produces rows that visibly skew away from cabinets or walls as they progress across the floor.
How to Prepare Your Brownsburg Home for Tile Floor Installation
A few things done before the crew arrives make the installation start on time and stay on schedule.
Radiant heat note for Brownsburg homeowners:
In-floor radiant heating systems — increasingly common in newer Hendricks County construction and master bath remodels — must be turned off at least 24 hours before installation begins. The system cannot be turned back on until thinset and grout have fully cured — typically three to five days after grouting is complete. We schedule around this requirement; it is not something we leave to the homeowner to manage on installation day.
What to have done before installation day:
- All furniture removed from the installation area — tile installation requires clear floor space; there is no working around furniture on a tile job
- Existing flooring removed if not included in the contract scope — confirm before the project starts whether removal and disposal is part of the scope
- Subfloor soft spots, squeaks, or high spots communicated in advance — flagging these before the crew arrives allows them to bring the right materials and plan for the repair time
- Indoor temperature stabilized — thinset and grout require ambient temperatures above 50 degrees Fahrenheit to cure correctly; the HVAC should be at normal operating temperature during installation and through the full cure period
- Plan for 24 hours off the tile after setting and 24 to 72 hours after grouting before the floor returns to full use — tile that is walked on before thinset or grout has cured will shift and the finish will be damaged
Related Flooring Services in Brownsburg
Looking for a different flooring product? See our full range of Brownsburg flooring services:
- Hardwood floor installation — solid and engineered hardwood, subfloor prep through final finish
- LVP flooring installation — waterproof, durable planks for kitchens, bathrooms, and basements
- Floor refinishing and sanding — restore worn hardwood to like-new condition
- Epoxy flooring — seamless, tough garage and basement floor coatings